Digital edge printing (also known as digital edge spraying) for hardcover books is a popular technique used for high-end picture books, collector’s editions, art albums, and limited-run hardcovers. It allows for the application of solid colors, gradients, intricate graphics, or even photographic-quality imagery across the top, bottom, and fore-edge of the book block. Achieving a finished product with crisp edges, uniform color, no ink bleeding, excellent colorfastness, and pages that do not stick together requires precise control over the entire process—from prepress and book block preparation to the actual spraying and post-print curing.

I. Process Principle
Process Workflow for Digitally Printed Edges on Hardcover Books
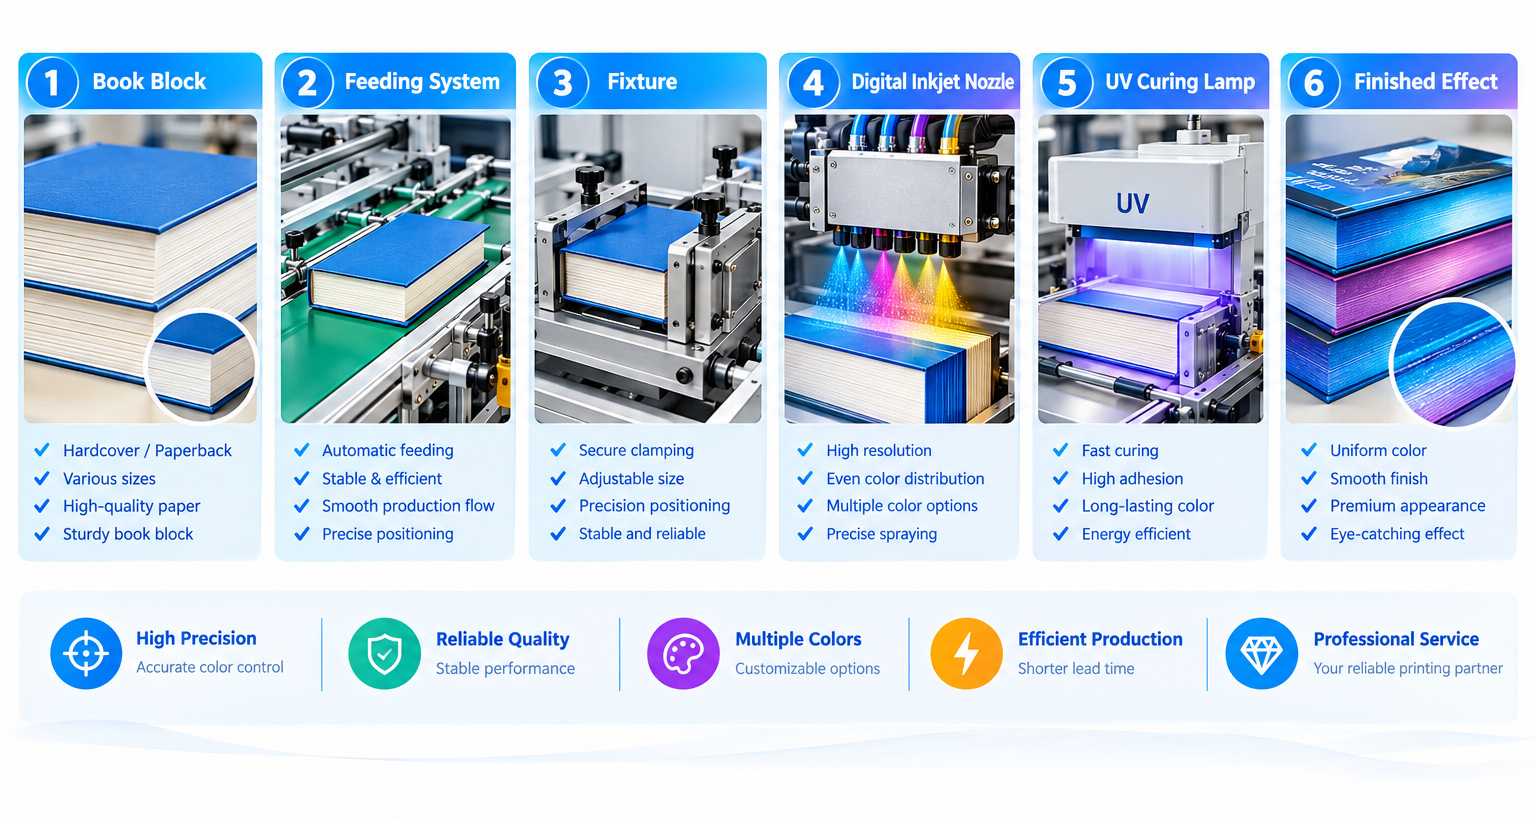
II. Prepress Design and Paper Selection
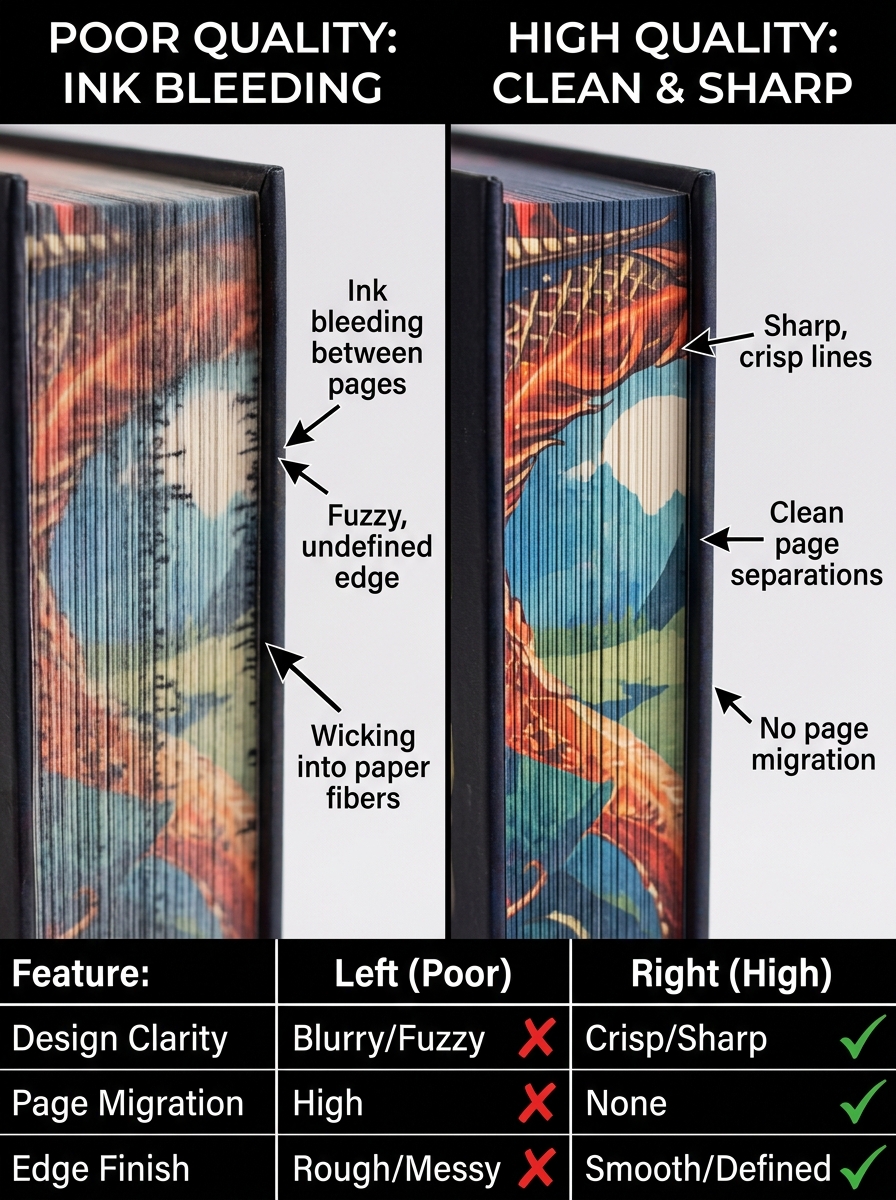
1.Design File Specifications
♦ Image resolution must be ≥300 DPI, using the CMYK color mode. For large areas of solid color, it is recommended to define a spot color (via an ICC profile) to minimize batch-to-batch color variation.
♦ Include a 3–5 mm bleed for designs extending to the book edges to account for minor alignment deviations during cutting and clamping. For designs that wrap continuously across three sides (head, tail, and fore-edge), the artwork should be separated into distinct layers for the head, tail, and fore-edge, allowing for alignment compensation within the RIP software.
♦ For book blocks with rounded corners: the corner radius should ideally be ≤5 mm, as curved surfaces are prone to image stretching and distortion.
2.Key Considerations for Paper Selection
♦ ❌ Highly absorbent lightweight paper: Features large fiber pores that cause capillary ink penetration, leading to ink bleed-through and pages sticking together.
♦ ✅ Recommended: Offset paper or low-absorbency text paper, which ensures stable color reproduction.
♦ Rough-textured paper: Apply a base coating (primer) to seal the fiber pores; this reduces ink penetration and improves the adhesion of the ink layer.
Practical tip: Before bulk production, you must use paper from the same batch to make a sample to test ink absorption, drying properties, and abrasion resistance.
III. Book Block Cutting and Base Surface Pretreatment
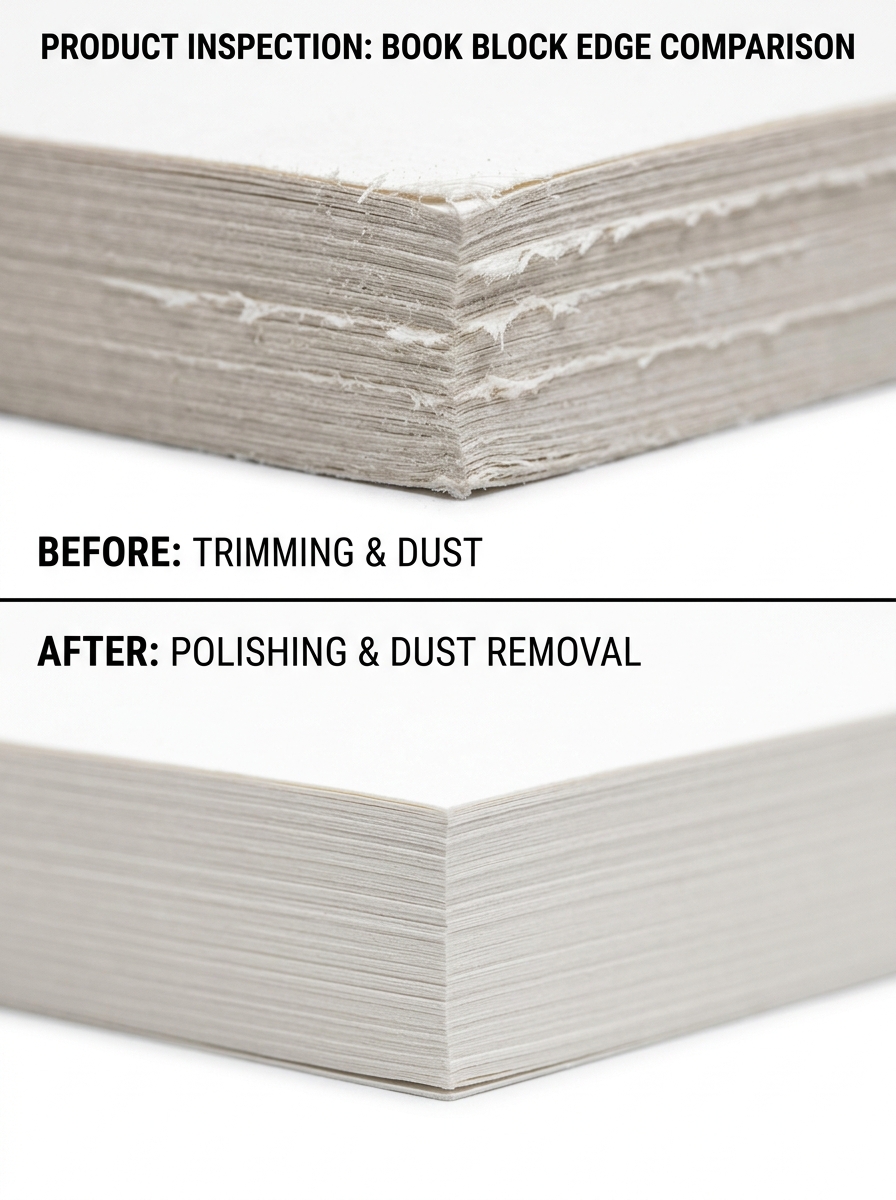
1.Process sequence:
Thread binding → Rounding and ridge forming → Three-sided precision cutting
Cutting objectives:
Straight cuts on all three sides, no burrs, and no unraveling of paper edge fibers. Rough edges can lead to uneven ink layer thickness and blurred edges on printed designs.
2.Dust removal at the cut edge:
Paper dust generated during cutting is the biggest hidden danger of edge spraying. Paper dust adhering to the cross-section will cause ink dots to appear grainy and ink layer adhesion to be poor.
♦ Basic Solution: High-pressure air-blast dust removal.
♦ Advanced Solution: Light sanding of the cut edges followed by a secondary dust-removal step, creating a uniform, smooth surface for spraying.
IV. Fixture clamping + masking determines the sharpness of the edge contour.
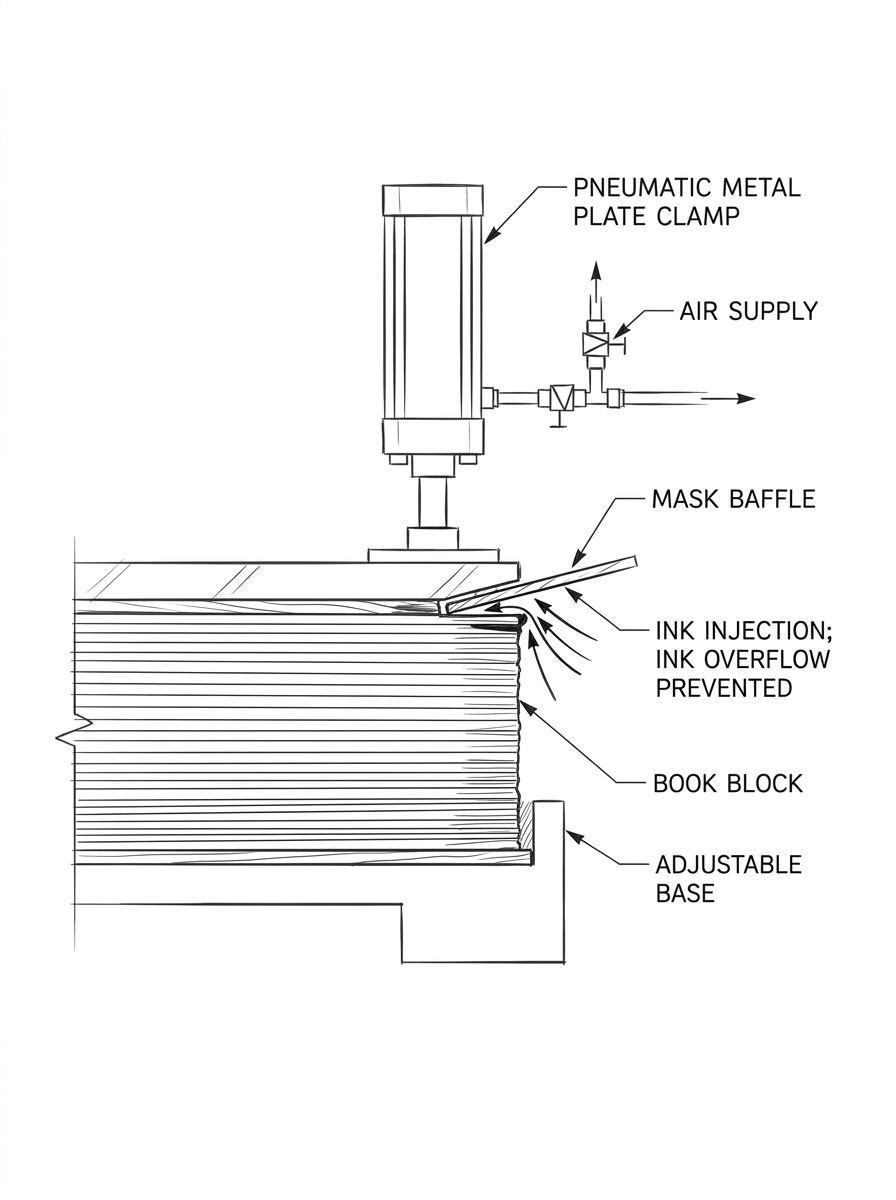
1.Clamping Pressure Control (Critical Factor)
♦ Insufficient pressure: Gaps form between pages, allowing ink to seep into the spaces, leading to ink smearing and pages sticking together.
♦ Excessive pressure: Can damage the book block, wrinkle the pages, and compromise the intended shape of the rounded and jointed spine.
♦ Recommendation: Pneumatic/hydraulic uniform clamps ensure consistent force distribution throughout the book.
2.Mask protection:
A rigid baffle is placed close to the upper and lower boundaries of the spraying area to prevent ink splatter from contaminating the front and back of the pages, ensuring that the edges of the pattern are clean and crisp, without any rough edges or smudging.
V. Digital Spraying and UV Curing
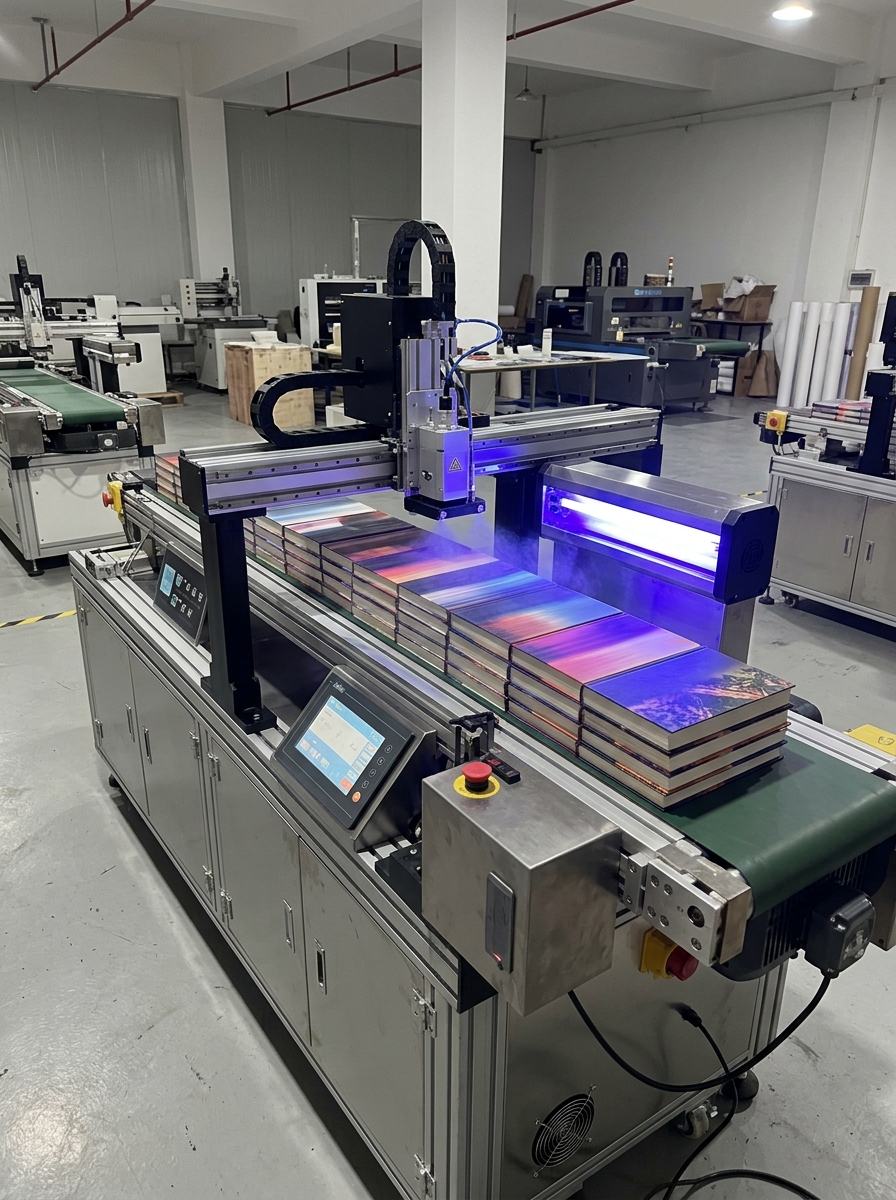
1.Ink selection:
Prioritize low migration UV inkjet inks, which have low odor, fast curing speed, and thin and flexible ink layers. Ink that is too hard can easily rub off or scratch when turning pages.
2.Spraying parameter control
♦ Maintain a stable nozzle height and a fixed spraying distance to avoid inconsistent ink droplet sizes caused by varying distances.
♦ Uniform scanning speed and droplet size; large areas of solid color reduce ink volume and prevent ink layer buildup and wrinkling; fine patterns improve resolution.
3.UV Curing:
As the printhead ejects ink, a UV lamp simultaneously irradiates it to trigger curing. Insufficient curing results in an ink layer that remains tacky and easily rubs off; excessive curing causes the ink layer to become brittle, leading to cracking when bent.
VI. Post-processing, Quality Inspection, and Hardcover Casing-in
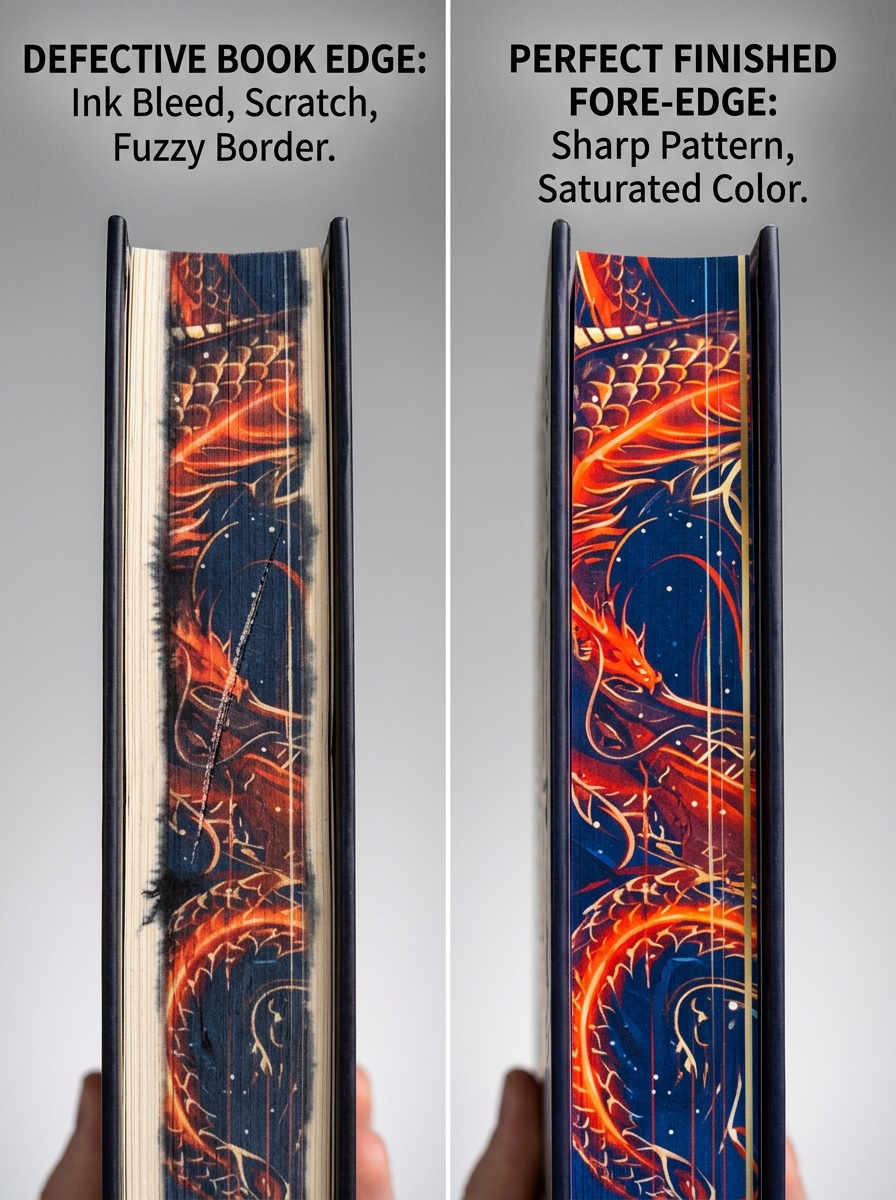
1.Post-processing:
After curing, loosen the clamps, let it cool and stand until the ink layer is completely stable; manually check whether the pages are stuck together, and lightly clean the surface ink.
2.Quality Inspection Checklist
✅ Accurate pattern alignment, no misalignment
✅ Sharp edges, no smudging or fuzzing
✅ No ink bleeding or page sticking
✅ Abrasion-resistant ink layer, does not fade with light scratching with a fingernail
✅ Stable color consistency throughout the batch
3.Final step:
After the quality inspection is passed, the printed edges of the book block are sprayed, then the hard cover and mounting are applied to complete the hardcover finished product.
VII. Quick Troubleshooting for Common Issues
1. Blurred or ragged edges on the design → Poor contact with the masking template / Insufficient clamping pressure
2. Ink seepage between pages or pages sticking together → Pages not pressed tightly enough / Paper is too absorbent
3. Ink layer easily scraped off → Incomplete UV curing / Paper dust at the cut edges not properly cleaned
4. Inconsistent color density across the book → Fluctuations in printhead height / Unstable ink volume settings
5. Stretching or distortion of designs on curved or rounded surfaces → Lack of pre-distortion compensation for curved-surface imaging
VIII. Summary
Digital edge printing for hardcover books is not merely a single printing step; it is a comprehensive system-based process encompassing pre-press design, paper selection, trimming and dust removal, specialized fixture clamping, digital inkjet printing, and UV curing.
By properly preparing the book block surface, ensuring uniform clamping and protective masking, and utilizing compatible UV inks alongside precisely processed RIP files, one can achieve vibrant, sharply defined, and durable edge designs. This significantly enhances the tactile quality and perceived value of hardcover books.